Sue Parry, one of the glass artists in the centre, stopped by a couple of weeks ago and asked if she could commission a photo frame.
"The only thing is" she says "I need to take it to LA next Wednesday"
Out comes a blank sheet of paper and we're off...designing the frame that's going to be flying through the sky over the pond, before the finish has had plenty of time to cure...
Sue and I are going through all sorts.. then I'll be back in a minute. In she walks with her laptop, on Flickr going through some photos of the furniture and home of the person who will be receiving the frame... brilliant, this really tells me a lot about this guy, what he likes and dislikes...
So back to the drawing board, and it's then I say," why don't I just make it like the inside of my cabinet door, I think that would suit.."
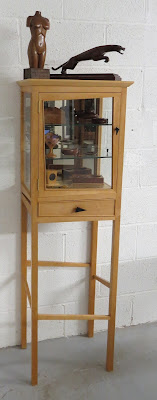
So Here's the Sycamore, Maple & Ebony Cabinet
and this is the inside of the door shape..
Here's the lock mechanism and the corner 'key's in Ebony
Out comes the cardboard, I cut up the card to the size of the photo, and start drawing around it until Sue's happy. "There we go, done".
Not quite, the Maple is only at 14% moisture. So I rough cut the Maple and took it home for a couple of days. Sitting on top of the wardrobe, then after each time I worked it, it was back home in the warmth easily down to 8-9 % before it was jointed.
This is the mock up on the wall..
Patterns and Maple cut...
The inside edges were cleaned up before assembly,
and the outside were done after the frame was dry...
Here's one joint from behind.. showing the kidney plate too..
It really started moving along now, I fitted the Ebony keys, rebated the back to take the glass, fitted some mount board to the photograph and some board for the back. Note the use of the kidney plates to hold all of the parts into the rebate. I like to use a hole for the method of hanging, that way the frame will sit tight against a wall, and I stamped the back board.
But..before I fitted the back board..
I placed one of my cards, dated and signed.
I gave Sue a nail and another card, folded in my tea stained recycled paper envelope..
It's just one of those things I do...saves paper and I like the stained look that a tea bag leaves
( I know...)
Showing the end and corners..
Done...
Sue was over the moon with it..and it jetted off to Los Angeles the next day.
All the best
Jamie


2 comments:
Great frame, and I like the cabinet even more. It looks like it could start moving at any moment, if only it could decide which way to go.
Hi Kevin,
Thanks for that, I hadn't thought of it in that way, but I do like what your thinking, maybe Ishould be getting on with another in the same style butwith a little more angle, what do you think? or do it falling the one way?
I enjoyed amking the frame, same as I did the cabinet, scribing the corners makes the frame making a whole different ball game.
Let me know what you think.
Jamie
Post a Comment