Friday, 24 January 2014

# Shop Stool Build Off.. Part 1

If you follow me on Twitter then you may already know..


A few weeks ago Chris Wong who is a wonderful woodworker from Vancouver, Canada..and I follow on Twitter. Asked if anyone was interested in building a stool for their workshop. He needed a new one and after a couple hours, I think there were three of us who had said "yeah great lets go for it.."

The idea was to have a Build Off, I think Chris had done this before with other projects. Design an item, then make it in a period of time, a weekend. When every type of professional to hobby woodworker could have a go..The weekend for the stool. 25~26 January 2014..

There was a prize.. someone would be the winner. I thought that just taking part and maybe I might be in with a chance of winning..Now that was fine for me just to be called the winner, and there are only a handful of guy's doing this..so yeah I'm in with a chance..(if I did win of course..much chance?..read on).

I then suggested we put up our own prizes, like a side bet as Chris calls it.. A tool from our own collection that is sent to the winner of the competition. Remember at this point there were only a handful of people doing it..

So..over the weeks some people have been posting blog entries about stool designs, the thought process behind height, width and loads of much more complicated things that I can remember and the build up to the weekend. Others have have been putting images of their stool on Twitter..Some are being drawn up on 3D CAD to get everything perfect..

Today is the Sunday before the event, so six days to go until next Saturday..There are now 75 people taking part in this build off..and over $2000 worth of sponsored prizes..Yes it's got that big..

So, to my stool.

I wanted to make a stool that looked cool, no waste of materials, with some sexy curves..I like some of the industrial early twentieth century stools and chairs used in factories, and offices.. but want a stool that would look cool in a modern kitchen or office, as I plan to make a short run of these beautiful stools..

Here is some of my inspiration,


Of the Four above, you can see lots of metal..where you see metal.. 
I will be making all of these parts in wood..

These are from one source click here 


This one is probably the the closest to what I will be making.

The timber of choice is..American White Oak..why ? because I have some in stock, it is straight grained, strong, used in a lot over here..

The last thing I want to show is a little more modern..but has some of the detail and the necessary parts to make my stool..


IKEA "Sveneiik" Piano Stool


As I type this..the first leg is laminated..and I'll be laminating the other two on the Friday before the 
the weekend..

I welcome your comments..and you can follow me on Twitter to see the progress.

All the best

Jamie

*****

Day one..

I knew that I had pushed some of the boundaries for me..and this was never going to be an easy build..

The legs are out of 1" White Oak planks, cut into thin strips to enable me to bend them to fit my former or mould. The first thing I had to do today was get the 3rd leg out of the cramps and run the three of them through the planer.. down to just over 20 mm, and that went great, they are starting to look really cool..


The next thing to do was to set up my big router in the router table, with my latest huge 1/2" Thumb Mould cutter

I wont be using it as shown, I'll be using it without the shoulders
on all four faces to create an ellipse

The stool is going to be viewed from all round, and I want it to perform as a shop stool but also create a talking point for visitors and clients.

So it's important to me that as you walk around it the section looks fluid..and it will.

Routing the Thumb Mould was a real pain, after I had cut the edge of one side it removed the area I needed to get the second cut, so i had to follow the bearing by eye, taking it down in a few cuts to stop it tearing out, the inner lower leg radius is down to 5" ..I lost a lot of time on this..with the couple of repairs. but hey ho..


Here's some of the de-lamination, whilst routing the Thumb Moulding on.


I then made the pattern for the two center boss's ..These are again in White Oak. around 5" diameter, they weren't too bad to make. Three notches around the outside, hole through the middle to be threaded and one to have a slight flat on the end grain to take my stamp.
The top Boss was made, this has a thread through it's centre, it will screwed to the underside of the seat and the threaded Beech spindle will be bonded into it.. It has the same Thumb mould around the underside and looks pretty cool already..


Marking up the boss' to make a pattern


There's a flat on one of the boss', just for my stamp..


Parts..


I'm using an old table leg in Beech for the centre spindle. It's on the lathe now but I'll turn it first thing in the morning..


Two of the six joints in the legs to the Boss's are cut and I'll be doing the others tomorrow in the daylight.


Thanks for looking,

Jamie

*****


Day Two..

A bit of a late start today, got into the workshop around 9 am.. later than I wanted, but I had time to think about what was sorted, and what I needed to get done.
The first thing to do was to get the joints of the boss' all done and get them glued up to the legs. I had already got two done, so only four more to do. But there was one thing that I needed to check out..

I knew that I couldn't just put two boss's any old distance apart..they were both going to be joined by the threaded spindle. So when the positions were marked on the legs I had to ensure that the boss' were on the threaded spindle then around the correct distance apart. I chose around 125 mm, this is 25 mm more than an Ikea piano stool shown in Part 1. I wanted this extra 25 mm so that the threaded spindle would have less play, one of the issues with that stool..

So then I just had to mark on each leg from a datum already taken from the former. I'm sure engineers know what I'm up to and there's probably all sorts of theory and practice stuff behind it. But what I do know, is that if I hadn't done this, then I would have been in all sorts of trouble..


Here you can see my last 'dry fit'


Each leg could now be bonded into the boss' and I chose to do them one at a time. with a couple of shop made jigs..

Next.. to turn the spindle for the threaded part.. and it started  really well. I turned the old Beech table leg down to 32 mm (11/4"), took it off the lathe cut some thread, then put it back on the lathe if it needed just a little more off, which it did on a couple of occasions. But the 'fun' started half way down, I hit a patch of knots, only very small, tiny in fact..but it was enough to start the grain ripping out..after that I couldn't get it back on track...so now all I could do was use my sample piece that was being used for cramping up the legs and boss'.. I did expect problems.. but not with the things I've done lots of times before... oh well.

This meant that I could get on with turning the seat.

I had two choices with the seat, Sweet Chestnut that would compliment the White Oak or..A turning blank of Purpleheart that I had had for over 20 years, that I've been hanging on to until the time was right.. The sweet Chestnut was over 2" thick and I didn't want to waste just under half of this thickness.. whereas the Purpleheart was the correct diameter and thickness, even with Its couple of flaws. So onto the lathe it went...I didn't take much off, just rounded the edges and dished the top to around 6 mm (1/4"). That was enough.

Then it was just a case of getting the top boss, (made the day before) fixing it to the underside of the seat with three lovely old GKN  11/4" countersunk slotted screws. After assembling all the parts I gave it a coat of Danish Oil with an extra additive that accelerates the drying.


And here we have my stool.

It was fun at times, quiet stressful. The de-lamination was a pain and I now know why it happened, and would build my new understanding of why into my process of laminating, I'll try it out and if it makes all the difference then It was a great lesson learnt.

Gluing up seventeen strips in one go was mad, I did expect the de-lam to be much worse than it was, so I wasn't far off.

The threading..I'll have to look into it. But the tap box isn't very happy..after hitting those knots, might just be a sharpen up.


Contrasting colours look great..

There will be a Part 4..look out for it..there may even be parts 5,6 and 7..but for the minute..

I'm done

Hope you enjoyed

All the best

Jamie

*****
The voting has started

And you can have your say..

Over 40 stools to look at.. all different types..wonderful..

Voting has now closed

Here is a preview of the stools with there respected number..

If you single click on the pictures they will enlarge to view in one single row


So there you have them..

I'll be perfectly honest with you, there are 5 that I would welcome in my home..


All the best

Jamie

Results..


Sunday, 19 January 2014

Glass makers paddles..

Just a quick one..

Every now and then, I get to walk around the centre in search of someone or something..

This one day there was a guy hiring the blowing studio..doing some great pieces with Ian Bamforth assisting him...after introductions, Graeme Hawes told me he had a lump of Cherry in his shed that he wanted to be made into paddles for flattening the bottom of items as they were being blown. His was uneven and had a hole in it !!  So he used another part of the paddle..

A few weeks later Graeme dropped off the log, no splits or shakes, just hard, very hard, much harder than some of the American Cherry I have, and this piece was from low down in the trunk..


This is normally where you find the paddles
In a bucket of water..


Here, Vic Bamforth is using a paddle to flatten the base of a vessel..
each Glass worker has the tool made to suit them or the timber they get..then it's part of their tool kit.


I had left cutting out the paddles until my bandsaw blade was on it's way out, the size of my blades are small really...16" Bandsaw blades are only around 140" long so they don't get re-sharpened, they get thrown away.!
 ..Now, the only problem with using other peoples timber is that it may have nails or staples somewhere inside..and it did. So the bandsaw blade was ruined, and I just carried on until the log was cut into four paddles..you can see 2nd piece from the right were the last two cuts..

And yes, I did use a metal detector beforehand..but nothing


Anyhow, paddles, made to the glass makers pattern, corners knocked off
Ready for Graeme to prepare for use..

Probably 60 years worth of work in these paddles..

I'll see what process Graeme goes through to condition these tools, and put it on here.

All the best

Jamie


16th March 2015

Just thought I'd add that these paddles were done for Graeme, not for cash but barter; an exchange of services or goods.. I liked Graemes glass work, so he was going to bring a piece in for me..

Hey I'm still here Graeme.. haha.. A valuable lesson learned. Hey it's only been 14 months.

Cheers

Jamie


Thursday, 9 January 2014

Windsor chair restoration


The Incredibly Wobbly Windsor Chair..


An antique Windsor chair has come into the shop to be re-assembled. The chair has been in the family for three generations. And I would say it's time this beauty had some tender loving care. The chair was still in use, and when you sat on it, it wobbled to the right about 3 to 4".
It really was quite scary.

How cool is this beautiful old Windsor...


Now, I'm loving this chair, it's got so much going for it, the colour and patina is fabulous..

click on the picture to enlarge


Look at these joints..all loose and worn out from the last 40 years of being loose..


You can see where the spindles have gone through the seat, 
with the wear showing..removing the patina..


More damage..Tricky under here..I won't be showing my method of fixing this,
some you just don't give away..


and there was some wear to the sockets and holes..

Plenty to get on with then. I was going for a sympathetic restore, agreed with the customer. Due to modern central heating, I used an adhesive that would hold the cleaned up joints, and fill in some of the sockets if there was some play after being tightened up. All of the old adhesive had to be removed, then straps were used to hold the piece together under pressure as the top 'forty six' joints were curing. I must say it's a lot easier writing about it, than doing the actual job, I locked the workshop doors and had to get it all sorted very quickly. 

Once cured, I set upon the legs, These were a bit of a pain, I striped and cleaned out joints, but didn't want to ruin the patina of the chair, so one leg stayed put..I kept the feet sitting flat to the floor and did all I could to ensure that she would stay sound for another fair, few years..

A couple of days later, the chair was sound. I then started the task of covering the lighter parts of the wood joints that could still be seen. As agreed, I removed some of the old paint splats that were around, and gave the chair an in-depth polish with some brilliant dark wax. 


The top part after work completed


Done..it does sit a little squiffed to the right,
but the chair is a lovely example of the bodgers craft,
twisted here and there from the settling and drying out over the years. 

Some chair makers would rather make you a new Windsor..I'd rather you keep the piece that you love and enjoy it the way you should..

All the best

Jamie 


Friday, 27 December 2013

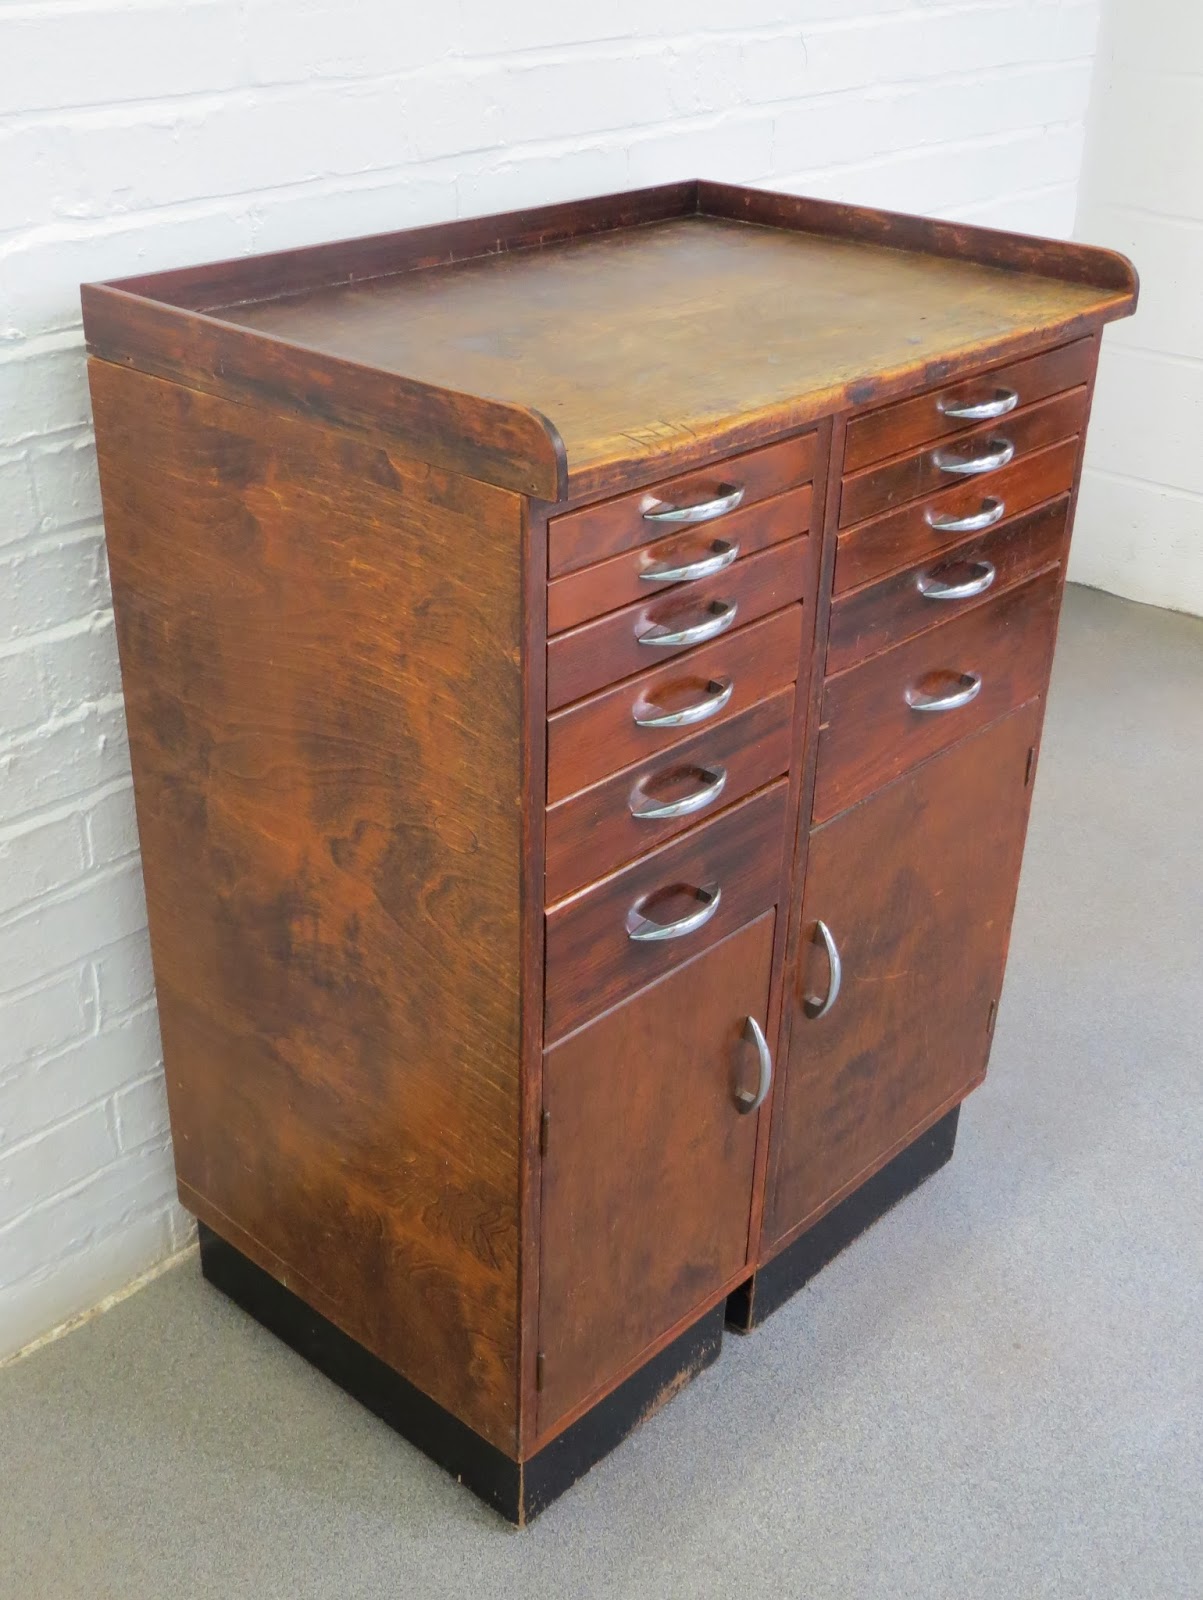
Watch makers/ repairers bench

A re-built, restored and up cycled..new piece of furniture


Jo told me about her fathers work bench..it sounded lovely, with its wonderful array of drawers, nooks and crannies, there were different widths, heights and multiple uses..

It had been in Jo's garage for a long while and she was getting concerned that it was going moldy.. We chatted and I suggested it could go in the house in one of the rooms.

The next day, Jo said it would fit in the corner of her dining room if it was a little smaller in length, and width...and obviously cleaner


This is what It looked like without the drawers
They came the next day, as it wouldn't all fit in the car..


Over the next two weeks I worked on the bench with one of my students, Jason.

Working with Jo, I cut the top down, leaving the most of the wear and tear showing.. Jason helped me fix the two cupboards together and put all of the edging back on. The drawers were loose, so they got a clean, and loads of the most tiny of watch parts fell onto my bench...

I carefully fixed the drawers, some of which now wouldn't slide back into the cupboard. A quick rub over with a plane soon sorted this little problem out..

After all of the alterations, it was time for a clean up, inside, outside and underneath all got some attention. All of the handles were removed and polished up just with a dry cloth. Then a couple of applications of wax and that was it..


I had decided to leave the small gap in the bottom of the plinth,
this shows its true origin


Jo will be putting all of her Dads tools, watch spares and memories back into those drawers and other personal items on the top just as she remembered them..safe and secure..

The shelf between the cupboards is now a shelf inside the tall cupboard, just where it would be of most use.

and those tiny watch parts..


Inside one of my memory jars..along with the shavings off the drawers.

Just add a little of you favorite essential oil.. keep in the cupboard to stop any stale smells

All the best

Jamie


Wednesday, 18 December 2013

Antoni Gaudi inspired feature window panel

A few months ago now, Paul Floyd came into my workshop and asked if I would be interested in making a curved frame for a stained glass panel commission that he'd just got.

Now he's got my attention - curved frame, sounds good to me. Tell me more..

Chris and Anne-Marie had been to Barcelona, where they had visited some of the fabulous work of Antoni Gaudi and wanted to have their own piece built into their new home. The commission was for a framed stained glass panel approximately 1100 mm by 1000 mm. The glass design was being carefully thought out and designed by Paul with Chris and Anne-Marie providing the ideas and inspiration.

The frame was down to myself and Paul working together, to get the best possible framework for this wonderful design of glass that he had put forward.

I had looked on the internet, and been blown away by some of the work that Gaudi had had made..So my next job was to get hold of a book with information and loads of pictures to help me get into this properly. A certain internet auction site came into play.


 A few days later I had in front of me a huge book by Maria Costantino click here to go to Amazon books to view. This is a great source of information, especially the photographs of the wooden framework.

Now, as I looked through the book I did feel that the frames could be thinner, I'm sure Gaudi was happy with what he saw, but we where working on a much smaller scale, where the size of the framework had to be in proportion with the overall dimensions, as well as with the glass and lead work.

Paul had had the design all signed off, and I was then concerned with where this frame was going to be sited.

I had questions..

  1. At what height was the frame going to be fixed
  2. What is the frame going to be connected to? beams, plaster-work
  3. On top of a door frame? How?
  4. Is the building very old style or more modern?
I contacted Chris, and we arranged for a site visit. I wanted to get a feel for the space and room around it. And I'm so glad that I did, I changed my mind about the frame a couple of times while I was there with Chris, and my main concern was the frame overpowering the glass, (Gaudis timber work is very chunky)
the depth of the wall it was going to be fitted into was quiet deep around 150 mm. A frame this deep would have definitely overpowered the glass.

After a couple of calls to Chris, who was really good about my concerns, and more or less said yes "Go with what you feel would be right"..I had the design in my head, easier for me to make, easy to install, and probably the most important, easy to change a piece of glass, should a pane get broken.

A pattern had arrived from the site carpenter, and with my dimensions taken at the time of my visit, I knew we would be no more than a millimeter or two away using this pattern.
Paul and I set to work on the pattern, I worked it so that I would be making two frames with the rebate for the thickness that Paul wanted for his glass and leadwork, this worked well for me. I'll put some pics here and show you.


These are the templates from the pattern,
I used these to mark and cut the timber too..


I built the frame onto some 18 mm board to help keep it all safe and secure,
Each joint at the moment is a butt joint, this gets the joint really tight.
Blocks help add pressure when gluing up.
The design of the frame, meant that at it's thinnest in the verticals, the timber between the two rebates would only be 2 mm wide. I was pushing the timber towards the edge of being too close for comfort.. But this is what I wanted from the frame. This was no ordinary joinery job.. Not many workshops would do a piece like this, and yet this is what makes me tick


While I was making the frame Paul was getting on with the glass panels.

Paul normally works to dimensions or straight off the frames. Where I'm more used to working in parallel, to dimensions or patterns. Here we are both working to the same pattern..that I checked, so I was happy and confident. I think that helped Paul, these glass panels had to fit straight away without the need to fettle..
And tension was growing, because the building program had a slot for us to fit the frame..I had decided that to give the frame a Gaudi colour, I would Button Polish the frame. a finish traditionally used on Oak furniture.


Here the frame has been sanded both sides, I shaped the Oak,
Then routered down to get the frame the same section through to the other side.

I have skipped a couple of stages now, I spent a while working out how this frame was going to be built up. And normally I don't mind sharing, but this is different. What I can tell you is that there were over seventy separate pieces in the building up of the frame and working the rebates.


The frame is rounded off with three different size cutters and then blended by hand.

click on photo for larger view


Detail shot of the masons mitre at the bottom centre of the frame.
I have stylized the mitre, I wanted to do it in a way that would catch the eye better, but not been seen before..I love it, and will do more like this..masons mitres are underated


The two frames, one will be fixed (with rebate to take glass), the other is removable just in case a piece of glass has to be replaced. That's why there are peg holes, for screwing the frame together, but will have dummy pegs to appear like a traditionally made frame.

You never know I might have to do it, so the easier it is the better.

The pegs can be removed with pincers, and in the holes are 11/4" x 6 countersunk screws


The first trial fit of the glass in the frame.
The glass fitted exactly as planned, we were both pleased with the outcome, and visitors to the workshops were seeing the work we do before there eyes, and loving it too.
Now the job is really starting to get there.


Here's the frame with two coats of shellac sealer, and six coats of Button Polish
(I mixed the polish to a traditional recipe)


Paul Floyd and myself, all glass dry fitted, ready to go in the car and be fitted that very day.


So within a couple of hours, of the last shot, here we are fitting the frame and glass into its new home for the next few hundred years. I had put a softwood frame around the Oak. This was going to be plastered around, in a curve to bring the flat wall round into the Oak, then the radius on the Oak goes around into the glass. This would re-create the feel that is seen in Antoni Gaudis work. The plasterer was going to have some fun, and I got the phone call that I expected to get about this.. the guys just love the flat stuff, and don't usually do curves.. but he was fine.


So this is how Paul and I left the frame, glass all installed and looking really quite different, the Oak looking lovely, Pine framework all round, ready for plasterboard above and the plaster curving from the flat wall into the corner of the Oak.

December 6th 2013


The house is finished now, and Paul and I are there to give the glass and the frame one last dust, clean and polish to complete the job. It's great to go and revisit a piece, and see how it has become part of someones home, part of the family's history, and I'm sure it will be there for a long while.

Just pictures now...


I hope you enjoyed that. I loved every minute of making the frame. If you would like a piece commissioned then please get in touch..

I will be posting a more equal, Paul & Jamie version on the Open Studios blog that I write too, where you can see more of Pauls work and a little less of mine.


Happy Christmas

All the best.. Jamie


Friday 20th December 2013

I have been in touch with Chris, and he's happy for me to share his testimonial on this page..


Dear Paul and Jamie,

We just wanted let you to know how thrilled we are with the glass panel we commissioned for our new home. When, following a trip to Barcelona, we first came to your studios with vague (some might say fanciful) notions of a Gaudi inspired window, we could’ve little imagined the end result would realise our somewhat hazy vision so spectacularly.

From the very start of the project, you involved us fully and made us feel part of the design process, though all creative credit must go to yourselves. The sinuous, naturalistic frame Jamie created reflects the research he conducted into Gaudi’s work, and is very evocative of the woodwork at Casa Batllo.  It is a truly breathtaking  piece of carpentry. Similarly, Paul’s stained glass suggests the wonderful sense of fluidity and uninhibited movement in Gaudi’s work.  The circular motif again echoes the stained glass at Casa Batllo, as does the subtle blend of textures and colours. It is stunning work of the highest quality.

When we commissioned the panel, we were looking for something that would pleasingly fill a void in a wall, and add something a little different to our entrance hall. What we got was the ‘Wow Factor’ in spades, with nearly every visitor passing comment on this striking piece of work. Gaudi was all about architecture as art, and that’s what you’ve delivered, and at a remarkable price, given the quality of the workmanship and the visual impact the piece has. So thank you both for your dedication, craftsmanship and, above all, imagination. You have enriched our home with something beautiful and unique, and we could not be more pleased. We hope to be able to commission you again in the future, and wouldn’t hesitate in recommending you to anyone else considering a similar kind of project.  

Very best wishes and thank you again,


Chris and Anne-Marie Fewtrell


and Chris's email..


Hi Jamie,

I've just read it and I'm even more in awe of the craftsmanship that went into the construction of the panel. I think the blog reads really well and I have absolutely no objection to any of the content, so please feel free to add my testimonial as and when.

Thanks so much again, a very Merry Christmas to you and your family from all of us.

Best wishes,

Chris


Wednesday, 27 November 2013

Gfeller Trub Phone

"The King of Phones"

I first came across these beautiful phones a few years ago, I bought one because it's wooden..

What better reason?..and it's still in use

I thought that I would put on here, what I have learnt about these beautiful phones. In one place as a reference for myself and for others. I have owned and cleaned up three of them so far, and got to know quite a bit about them. You can read other info about them elsewhere, but on here I want to talk about the phones as we see them

From what I have seen there are three species of timber used for making these, Cherry, Maple and Rosewood..and if you look at the boxes of some you can see the Cherry version, I have yet to see any of the other phones on the box. The timber blank is CNC cut, the insides are really well done, with holes drilled out, then inserts fixed for screw threads, and the quality is great.

Click on picture to enlarge


The keys are pressed metal, Gold anodized, over the plastic buttons


The handset is from one blank piece, cut apart, each one hollowed out, then put back together using the same inserts as before, with brass screws, as seen. 


The cradle. The handset sits on two pieces of leather, that are recessed into the body of the phone. The center mounting piece is of plastic with a clear section in the middle for your telephone number to be written on the very small piece of card. The clear acrylic has to be removed to get to the card.


The hole by the bottom left hand rubber foot, houses the three way switch for the volume levels.
Notice the original stickers/ labels underneath.. the more stickers the better.
Please don't ever remove these, I'm making a note of the codes


If you get a really good one, the handset is made from the same style/type of grain.
The grain can vary a lot, The handset can match in grain and be similar to the body, but I've also seen wild grain with plain and straight grain

If you would like one of these phones, please contact me. I have a list of clients after them when they are available. 

Get on the waiting list...email me with your details

Note

One last point..

Please remember these phones come in different timbers, so the colour is different. They are 'Rosewood', Maple and Cherry. Some sellers don't know what they are selling and get the information cut and pasted off other websites..please be aware of this when buying online. The text will say one thing when the pictures tell the real story..  That's if they use their own photographs, and not 'stock photographs'... 

and yes I've had my fingers burn't..

All the best 

Jamie

Just found this other piece on another one of these beautiful phones. This guy loves his..have a read.
Another link to Trub Phone at Powerhouse museum.com

Thursday, 13 June 2013

Oak Box Commission

It started with a Google search...  like ..  'Custom made box..'


I had had a couple of emails from Becky, about making a box for a friend of hers, we exchanged a few emails and Becky came over to the workshop with plenty of details about the sizes and other requirements. We discussed the design, the timber, and style of the box, then how the tray would sit and the loose lid would fit to the box. And of course the finish, after meeting with Becky, something just felt right that I would enjoy doing this one. The job card had now got all of the information that I needed..


Given a reference number, and added to the work schedule.

I try to organise my machine time, so while I had the planer out working on another project, I planed the timber up.


I was hoping to prepare enough wood to possibly make another couple of small boxes at the same time, but concerned about the sizes a bit, as when I read through the details all of the dimensions were internal. I was limited to the amount of Oak I had, so I planed up the two small planks having worked out that I could get the box and tray easily from them.


I Tweeted some of the pics as it was being made, so if you want to keep in touch with what I'm up to pretty much as it happens, then that's the best way..


This turned out to be a lovely box..


click on pictures to enlarge


The lid sits on top of the box, held in place by two small strips of Oak


The colour matches all round because it's all out of the same two pieces
from the same much larger plank


The tray is 20mm deep for playing cards and sits 6 mm below the top edges
A compartment either end for cards and other items.


The tray supports are specially made quadrants, from the same plank 
They keep the tray at the right height and add support to the corner joints.

click on pictures to enlarge


The tray sits 42 mm over the inside base specified by Becky


The box is finished with 6 coats of Danish Oil, with an Open grain satin finish,
which can be left, or waxed to a high gloss if required


A beautiful 21st Birthday gift


Thanks for reading

All the best

Jamie