Tuesday, 26 March 2013

LA Photo frame..Maple and Ebony


Sue Parry, one of the glass artists in the centre, stopped by a couple of weeks ago and asked if she could commission a photo frame.

"The only thing is" she says "I need to take it to LA next Wednesday"

Out comes a blank sheet of paper and we're off...designing the frame that's going to be flying through the sky over the pond, before the finish has had plenty of time to cure...

Sue and I are going through all sorts.. then I'll be back in a minute. In she walks with her laptop, on Flickr going through some photos of the furniture and home of the person who will be receiving the frame... brilliant, this really tells me a lot about this guy, what he likes and dislikes...

So back to the drawing board, and it's then I say," why don't I just make it like the inside of my cabinet door, I think that would suit.."

 
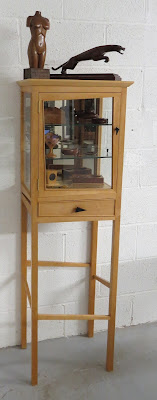
So Here's the Sycamore, Maple & Ebony Cabinet
 
 
and this is the inside of the door shape..


Here's the lock mechanism and the corner 'key's in Ebony
 
 
Back to the drawing board, within minutes we've sorted the design, and now we're onto the sizing.

Out comes the cardboard, I cut up the card to the size of the photo, and start drawing around it until Sue's happy. "There we go, done".


Not quite, the Maple is only at 14% moisture. So I rough cut the Maple and took it home for a couple of days. Sitting on top of the wardrobe, then after each time I worked it, it was back home in the warmth easily down to 8-9 % before it was jointed.

 
This is the mock up on the wall..
 
 
Patterns and Maple cut...
 
 
The inside edges were cleaned up before assembly,
and the outside were done after the frame was dry...
 
 
Here's one joint from behind.. showing the kidney plate too..
 
 
It really started moving along now, I fitted the Ebony keys, rebated the back to take the glass, fitted some mount board to the photograph and some board for the back. Note the use of the kidney plates to hold all of the parts into the rebate. I like to use a hole for the method of hanging, that way the frame will sit tight against a wall, and I stamped the back board.
 
 
But..before I fitted the back board..
 
 
I placed one of my cards, dated and signed.
 
I gave Sue a nail and another card, folded in my tea stained recycled paper envelope..
It's just one of those things I do...saves paper and I like the stained look that a tea bag leaves
( I know...)


Showing the end and corners..
 
 
Done...
 
Sue was over the moon with it..and it jetted off to Los Angeles the next day.
 
 
All the best
 
Jamie

Monday, 25 March 2013

Chopping Boards..

Some things can start with a simple move around of some shelves..

I had put some new lighting in the Gallery part of my workshop, and it's looking pretty good, but in doing this the shelves needed dusting off, so I set about dusting, and in moving things around, found that I had a chopping board under a Wedding Archive box...I just hadn't picked up on it being under there..

Later that week, in walks Wendy, and straight away says she likes the Oak board on the shelf. When I tell her that it is all finished by hand, as in planed all round, then I use a scraper to finish the surface and corners.

Then after oiling with Mineral oil, I stamp my 'mark' in the middle of both ends and finally I burnish the corners and edges with a small block of the same timber, this gives a wonderful natural shine to the surface..

No sandpaper...at all..

It takes a bit longer by hand, but worth the effort and you can see it..

So it went. Number 1 gone

And it was time to make some more out of piece's of Beech and Oak worktop ends, sink cut-outs and hob cut-outs hanging around the workshop since I moved in.

Each board is a different size and while I have this stock I'll keep track of the sizes and they'll go through my books with a number.

So on Thursday, I'm working with Chris one of the students, and I'm showing him how to use the cabinet scraper, in walk a couple of ladies, Pat and Patricia, and before we know what's happened, Pat want's one of the boards, the one we're working on.. After a few minutes we have to prepare this board for sale, and go through the above process to complete it.

Wonderful.. It's great when people 'get' what it is you do...


Oak & Beech chopping boards.

Different sizes every time so I don't waste any wood, no two the same..

Have a look in the


 Gallery Items for sale


Come and have a look and enjoy seeing what I get up to in my workshop.
Every day is a different day.

All the best

Jamie

One for Cat lovers...

Based at the Ruskin Glass Centre, means that there is always something going on, and leaving the doors open means that anyone can walk in at any time. I'm okay with this, if I need to do some machining on the bandsaw for example, then I just shut the door and if I'm making lots of noise I'll turn the key. Do whatever needs doing then unlock the doors afterwards. That way people in the centre don't hear my loud machinery, and I get dedicated, safe time on the machines.

I'm going to work out some kind of card system to put in the windows, This should make it easier for the communication between myself and a visitor.

Anyhow, over the last few weeks I've had a number of visitors, who have made some fused glass in a workshop here at the Glass Centre, and was after some wooden blocks to stand the pieces in, quite a straight forward job. But one that a larger company probably wouldn't bother with..

I don't mind doing them, it helps them out and I make use of some small piece's of timber..

 
A lovely piece of glass work, with two siple 'feet' made in Beech to go with the wood in her kitchen.
Diane's going to oil these...
 
 
And another block for this piece
 
 
I'll put these and some more on the miscellaneous page.
 
All the best
 
Jamie


Tuesday, 5 March 2013

First evening class piece finished..

When Rebbecca had finished her first piece of stained glass, the only thing it needed was a frame...

She came to my workshop with a few ideas, but not really sure which one would suit the piece, it was then that I thought that if she came onto my evening class, we could work out the design as she made it, to ensure she got exactly what she wanted.

And tonight, Rebbecca has finished her Pine wood frame, made for the stained glass that she made in another class at Ruskin Glass Centre, with Paul Floyd.


Then what finish? the black stain originally wanted? or not...

Well, we sampled the Black Stain, and tried out some Oil, Rebbecca has taken the samples home and is going to live with it for a while, before comiting..

I think it looks great natural.


All the best

Jamie